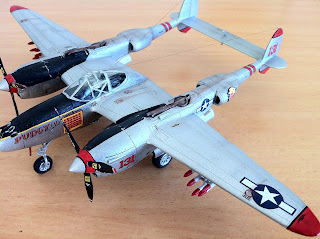
P-38J Lightning (Dragon 1/72)
Maj Thomas B. McGuire
475th FG at Dulag, Leyte
Hello everyone!
After a long period of non-modelling due to moving to another country (Brazil to Australia), I'm finally took the time and re-organised my gear to start in model building again!
As I have a passion for P-38's I have decided to start with this one from Dragon in 1/72nd scale.
It is a very nice kit, easy to build, crisp recessed panel lines and an honest cockpit which deserves a little bit of scratch or aftermarket parts details to bring it to life, not in my case though! After four years without modelling I just wanted to go straight and out of the box with this one! One thing I just noticed when I was already painting it is that Dragon didn't include a pitot tube in this model (I'm not kidding!) and I had to do it by scratch. The decals are nice, a little too thick but they react very well to decal settings and Future.
Click on the photo to enlarge (Clique na foto para aumentar).
Click on the photo to enlarge (Clique na foto para aumentar).
I'm sorry I didn't have any photos on the assembly, so here is the model after the primer and after the correction were made!
Another view with the primer applied.
 |
| Outra vista com o primer aplicado. |
A very roughly applied pre-shade since my intention is to make an abused plane to the conditions it usually had in that theatre of operations.
 |
| Pré-sombreamento aplicado bem a esmo, pois pretendo fazer um avião envelhecido pelos combates e pelas condições adversas encontradas naquele teatro de operações. |
The propellers are a little too complicate to put together but I did my best, next time I'll try to construct a template to help me put them together at the same inclination (pass). Here they are with the first coat of black paint.
Here with the decals aplied and a coat of Future to seal and level everything.
 |
| Com os decais já aplicados e uma camada de Future para selar e nivelar tudo. |
Another view, now it is waiting for some weathering.
 |
| Outra vista, agora é só envelhecimento. |
And the bird is silver! I painted with Tamyia acryclic paint Silver, very thinned (almost 60% thinner : 40% paint) because I wanted the pre-shading to show through.
 |
| Já pintado com tinta acrílica Tamiya - Silver, bem diluído (quase 60% solvente : 40% tinta) porque minha intenção era que o pré-sombreamento feito anteriormente ficasse evidente. |
Bits and pieces painted and waiting for either decalling or weathering. The interior green from Gunze was sprayed inside the wheel bays and doors.
 |
| Algums componentes já pintados e aguardando serem envelhecidos ou aplicação de decais. O interior green é Gunze e foi aplicado no interior das caixas de rodas e nas portas desses compartimentos. |
The rockets painted and also waiting for completion.
 |
| Os foguetes pintados aguardando finalização. |
The set of propellers with the final decal applied and the spinner on place.
 |
| O par de hélices já com o último decal aplicado e o spinner no lugar. |
There she is with all decals in place.
 |
| Aqui com os decais todos já aplicados. |
A side views.
 |
| Vista lateral. |
Underbelly!
 |
| Vista ventral. |
Another view.
 |
| Outra vista ventral. |
And here is the final product! The finished model.
 |
| Aqui o modelo terminado! |
After a final coat of Future to seal and level the model I brush Matt Varnish from Vallejo over the decals to make it matt and give a contrast with the rest of the plane body.
 |
| Depois de passar uma última demão de Future para selar e nivelar a pintura eu apliquei um verniz fosco da Vallejo com pincel em cima dos decais para dar um contraste com o resto do avião. |
Take a look into the scratch built pitot tube made out of a hypodermic needle close to the christmas tree 5.5 inches rocket launcher.
 |
| Observe o tubo de pitot próximo ao lança-foguetes feito em scratch usando uma agulha hipodérmica. |
And that's it! I was quite happy with the end results after so many years without model building. And this model became especial since I was granted my Australian citizenship this week! Now I'll have to model an Aussie model to celebrate!
Aussie, aussie, aussie! Oi, oi, oi!
E é isso pessoal! Eu fiquei muito felix com o result ado final depois de tanto tempo sem montar nada. E esse modelo ainda tem um significado especial já que seta semana recebi o meu certificado de cidadania australiana, agora terri que montar um modelo aussie (apelido dos australianos) para celebrar!
Aussie, aussie, aussie! Oi, oi, oi!
Cheers!
PS: After finishing the model and took the photos I wasn't quite happy with the aerials, it was so over-scale, so I re-did it using my wife's hair (she is a brunet so I don't need to bother painting it! LOL!
PS: Depois de finalizado o modelo e depois que tirei as fotos eu não fiquei satisfeito com as antenas que ficaram fora de escala, então as refiz usando fios de cabelo da minha esposa, por ela ser morena nem precisei pintar! LOL!


No comments:
Post a Comment