Mustang III - RAAF (Hasegawa 1/72)

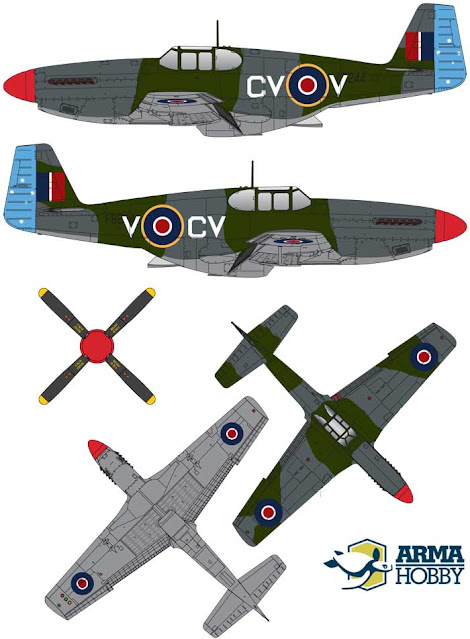
 Mustang III, FB244/CV-V  3rd Squadron RAAF (Hasegawa 1/72)

Fano - Italy, April 1945


Kit: Hasegawa #AP11 Scale: 1/72

Aftermarket:

  • EzLine for the antenna.
  • Eduard Photo-etch set #72 110 P-51B/C Detail set for Hasegawa kit.

The kit was originally released in 1992 and have a few issues like:

  • The wing is from a D version not a B/C;
  • The wheel wells are too shallow; and
  • Very minimal interior details.

Originally formed on 1 July 1925, 3 Squadron was one of twelve permanent Royal Australian Air Force Squadrons in existence at the beginning of the Second World War. In the first months of the war the squadron adopted an operational alert status, absorbed new personnel and intensified its training, prior to being identified to accompany the 6th Division of the Second AIF overseas as an attached army co-operation squadron.

Leaving its aircraft behind, 3 Squadron sailed from Sydney on 15 July 1940. Arriving in Egypt on 23 August 1940, the squadron was placed under the command of the Royal Air Force's Middle East Command and organised a three flight army co-operation squadron: two flights were equipped with Gloster Gauntlet and Gladiator fighters and the third with Westland Lysander utility aircraft. It commenced active operations in support of British Commonwealth land operations in the Western Desert on 3 November 1940.

During the next four and a half years, 3 Squadron became one of the most active squadrons in the RAAF, quickly becoming a jack-of-all-trades. In addition to the conventional reconnaissance and ground attack roles of an army co-operation squadron, it defended ground forces and bombers from enemy aircraft, and conducted strikes against enemy shipping. The squadron was involved in the first Allied campaign in Libya between November 1940 and April 1941, and played a critical role in the invasion of Syria in June and July 1941. In September 1941 it returned to the see-sawing war in North Africa, which finally ended with the defeat of the Axis forces in Tunisia in May 1943. Operating from Malta initially, the squadron supported Allied operations in Sicily between July and August 1943. Sicily was a stepping-stone to Italy, which became 3 Squadron's principal area of operations for the rest of the war.

3 Squadron's original aircraft had been replaced by Hawker Hurricanes by January 1941, but for most of the war its principal workhorse was the Curtis P-40, with which it was first equipped in May 1941. Two successive variants of the P-40, known as Tomahawks and Kittyhawks, were employed by the squadron before they were finally replaced by North American P-51 Mustangs in November 1944. In Italy, the squadron adorned its aircraft with a southern cross painted on the rudder, a practice which has been continued by more modern incarnations of 3 Squadron to the current day.

3 Squadron's war was brought to an end by the surrender of German forces in Italy on 2 May 1945. Since November 1940, the squadron had been responsible for shooting down 217 - enemy aircraft, making it the highest scoring British Commonwealth squadron in the Mediterranean theatre of operations. It destroyed another 29 aircraft on the ground in addition to 709 motor vehicles, 28 water vessels of varying sizes, and 12 locomotives. The squadron sailed from Egypt for home on 27 September 1945 and was disbanded at Point Cook in Victoria on 30 July 1946. 3 Squadron was, however, destined to reform in 1948.


Modifications to the kit:

  • Cockpit detailed with Eduard P-E.
  • The antenna wire was made using EzLine super fine.
  • Pilot figure from spare parts box with arm scratch-built to correctly have the controls manned.
  • “Turning” propeller scratch-built and painted.
  • Decals for this version from the Arma Hobby kit #70038
  • Paint scheme:
    • Tamiya Acrylic - XF83 Medium Sea Gray 2 (RAF) for underside surfaces.
    • Tamiya Acrylic - XF-81Dark Green 2 (RAF) and XF-82 Ocean Gray 2 (RAF)  for upper side camouflage.


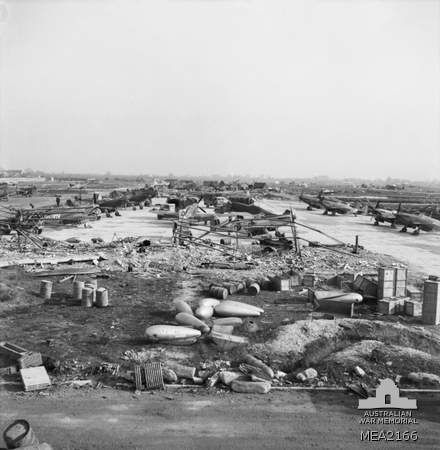
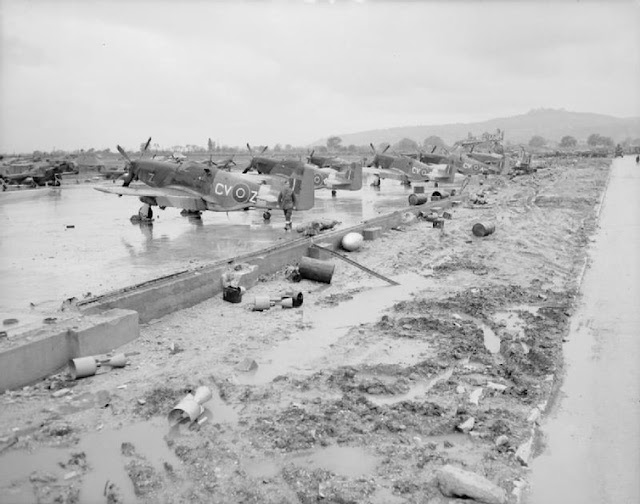
Reference Photos


This is the only known photo of the depicted aircraft V-CV


Model Photos


That's all folks!

F.M.A. IA-58A Pucará (Special Hobby 1/72)

F.M.A. IA-58A Pucará (Special Hobby 1/72)

Argentinian Air Force (A-511)

Brigada Aerea III / Grupo 3 de Ataque - Escuadrón Pucará Malvinas Pilot: mayor Carlos Tomba


Kit: Special Hobby #SH 72047 Scale: 1/72
Aftermarket: No aftermarket used, built out of the box with a few scratch built details.


The kit is a short run, overall fitting is bad. It comes with some resin and PE parts.


There are plenty of versions to chose from for the Pucará during the Falklands war, however I decided to model the A-511 after reading the account below from the book The Pucará Story, Mushroom White Series 9121, by Ricardo Caballero and Phil Cater.  Mushroom Model Publications, 2013.

"Premier Teniente Juan Micheloud in A-533, and Mayor Carlos Tomba in A-511 engaged in a rocket attack on an observation post which had been directing naval gunfire from HMS Ardent against Condor/Darwin, but while seeking further targets, they were detected by HMS Brilliant’s radar controllers, and jumped by three Sea Harriers from 801 NAS on a nearby Combat Air Patrol - Lt Steve Thomas in XZ456/008, Lt Alisdair Craig in his first CAP in XZ495/003, and Lt Cdr “Sharkey" Ward, leading the trio in XZ451/006.

Micheloud escaped into a low valley, but Tomba’s aircraft was attacked simultaneously by the two Sea Harriers flown by Thomas and Craig, though their cannon fire fell short. A-511 was then hit by 30mm cannon fire from Ward’s Sea Harrier. This attack set the starboard engine ablaze, and severely damaged the outer wing. The two other Sea Harriers also missed on their next pass, but a second ground level attack by Lt Cdr Ward again found its mark, this time hitting the port engine, setting that on fire and shattering the rear canopy. A third cannon attack by the other pair still missed, and it was only on a final pass that the Pucará was finally downed by the guns of Lt Cdr Ward, his shells setting the fuselage ablaze and scattering debris from the doomed aircraft. Mayor Tomba, showed great determination to fly on, despite being raked with cannon fire, only ejecting at extremely low altitude at the last possible moment. He parachuted near the wreckage, which had pancaked into the ground and broken up, its munitions exploding, while Ward’s Sea Harrier briefly circled above. Tomba then made his way to an abandoned house, and was later picked up by a Bell 212 of Grupo 7, and returned to Goose Green/BAM Condor. There, nine days later, he became a POW when the airfield and settlement fell to 2 Para on 30th May 1982.

Tomba later volunteered his services as an interpreter for the wounded Argentinian casualties being treated at the field hospital at Ajax bay, thereby helping to save life and limb - much to the gratitude of Surgeon Commander Rick Jolly. It was from him that Tomba learned of the high regard which the Sea Harrier pilots had for him in tenaciously staying with his aircraft under such intense fire - Sharkley Ward passing on a message exclaiming he was thrilled that Tomba was “alive, well and useful…!”


The account about was crucial to determine the ordnance (LAU-3 rocket launcher) that I chose to equip the model.


Modifications to the kit:

  • Separated the 1 piece canopy in order to display it opened .
  • 4 x LAU-3 Rocket launcher (Hasegawa 1/72 scale Aircraft Weapons: 1 - US Bombs & Rocket Launchers, #X72-1).
  • Scratch-built wing positioning lights.
  • Scratch-built landing lights on the wings pylons. 
  • Camouflage colour scheme: I wasn’t able to find a photo of A-511, however, according  to the book The Pucará Story , Mushroom White Series 9121, by Ricardo Caballero and Phil Cater .  Mushroom Model Publications, 2013 - Chapter 6: Camouflages and Markings and Notes for Modellers, on the table at pages 104 & 105 - Table for Ultimate 1982 Colour Guide, the Federal Standard (FS) suggested for A-511 are the same suggested for aircraft A-532 (which there is photo evidence). So I based on the available photo for A-532 to determine the right colours. I used the kit instructions as reference for the camouflage pattern. The anti-aircraft recognition panels (yellow markings) were included. In the kit instruction it does not show the yellow panel under the wing, which is a mistake from the instructions since it was the current procedure for the panel painting and present on the photo for A-532.

Extra reference photos:


Below is the only known photo of the A-511, unfortunately made a few years after the crash.


Landing gear detail for the brake line, this is a post war aircraft so the landing gear is painted instead of anodised aluminium


Final photos:


Below are the finished model photos.


 Cheers!